GATE 2010-material
-------------------
Video Tuts by IIT prof's
CODE
http://nptel.iitm.ac.in/courses.php?branch=Comp
--------------------------------------------------------------------------------
Discrete Mathematics Notes
CODE
http://www.ziddu.com/download/4936064/DiscreteMathematicsNotes.pdf.html
--------------------------------------------------------------------------------
Data Structures & Algorithms
Fundamentals of Data Structures by Ellis Horowitz and Sartaj Sahni
CODE
http://www.ziddu.com/download/5082547/FundamentalsofDataStructures-EllisHorowitz.rar.html
--------------------------------------------------------------------------------
Data Structures and Algorithm Analysis in C - Mark Allen Weiss
CODE
http://www.ziddu.com/download/5082546/taStructuresandAlgorithmAnalysisinC-MarkAllenWeiss.rar.html
--------------------------------------------------------------------------------
" Data structures " Schaumm's outline series
CODE
http://rapidshare.com/files/241530688/McGraw_HillSchaums_Outline_of_Data_Structures_with_Java_2nd_Edition_-0071476989.pdf
--------------------------------------------------------------------------------
Software Engineering
SE - Somerville
CODE
http://www.ziddu.com/download/5130907/SoftwareEngineering-Pressman.rar.html
------------------------------------------------------------------------------
SE- A Practitioners Approach (Roger Pressman)
CODE
http://www.ziddu.com/download/4070368/SoftwareEngineering-Pressman.pdf.html
----------------------------------------------------------------------------------------
Solutions to all the back exercises of Galvin - OS
CODE
http://www.ziddu.com/download/5239509/OSInstructorssManual1thedStudentRockStars.pdf.html
-----------------------------------------------------------------------------------
JOHN MARTIN SOLUTIONS for TOC
CODE
http://www.cit.gu.edu.au/teaching/3515ICT/resources/IACL%20Solutions/sols.html
------------------------------------------------------------------------------------
Modern Digital Electronics by R.P. Jain
CODE
http://books.google.co.in/books?id=-K_eX32KZKkC&dq=digital+electronics+by+rp+jain&printsec=frontcover&source=bn&hl=en&ei=9a5QSsDVO4yW6wPu47DHCw&sa=X&oi=book_result&ct=result&resnum=4
Saturday, December 19, 2009
Change the Default Directory of Software Installation
Change the Default Directory of Software Installation
You may want to change the location of your system default folder (C:\Program Files) from C drive to another system drives (D or E drive). By default software setup will attempt to install program in C:\Program Files directory. It is good practice to make the backup of the installed programs, if you installed all your programs in other than C drive. If you have little knowledge about editing windows registry then you can configure your computer for this purpose.
Follow the given steps to configure windows registry:
1. Click on Start button then type Regedit in Run option.
2. Here navigate to: HKEY_LOCAL_MACHINE\SOFTWARE\Microsoft\Windows\CurrentVersion
3. In right side panel, double click on ProgramFileDir.
4. Now modify the value to any other drive (for example D:\Program Files).
Now close the registry editor and restart your computer after any changes to go into effect.
Sunday, December 6, 2009
Set background pic for any drive without software
Set background pic for any drive without soft...
Perform the following steps ..
+ Open notepad and copy the following code :
[{BE098140-A513-11D0-A3A4-00C04FD706EC}]
iconarea_image=D:\Wallpapers\celeb\Genelia.jpg
iconarea_text=0x00FFFFFF
+ Here, the path in the 2nd line of code represents the path of your picture.
+ Now save this file as DESKTOP.INI in the location(any drive or any folder) where you desire to set the background picture.
+ After setting it in your favourite location,close the drive and open the location again.
DONE !! .. your picture has been set as background picture for your desired location.
NOTE : Make sure that the extension in the path should be .jpg only and file should be saved as DESKTOP.INI only.
Friday, December 4, 2009
how-to-install-chrome-os-in-virtualbox
First you need to download the Chrome OS image from Gdgt.com (Chrome OS VM image download) and download and install VirtualBox (VirtualBox download). Installing VirtualBox is pretty straightforward so I won't go into that. Choose the VMware image on Gdgt.com, as I could not get the VirtualBox image to boot. You can still use the VMware image with the VirtualBox program.
1. Make a New Machine

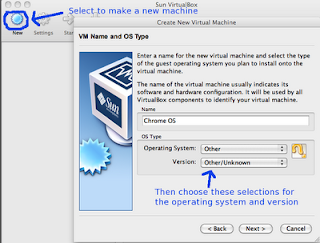
After you have VirtualBox opened up, Select the "New" button in the top left corner to create your new Chrome OS machine. Next, name your machine (I chose Chrome OS) and select "Other" under operating system and "Other/Unknown" under version. I think it would be okay to leave it on "Windows" and "XP" for these options, but I'm not sure if VirtualBox does anything special for a Windows machine, so I went with a generic start.
Update: It looks like the network connection won't work in Chrome OS for some people if they choose "Other" for their OS. We found out (through the discussion in the comments) that picking "Linux" as the operating system and "Linux 2.6" as the version might work better for some host PCs.
2. Select the amount of RAM for you Chrome OS virtual machine

Next you select the amount of RAM to dedicate to your Chrome OS virtual instance. I selected 542 MB of RAM as this should be plenty for Chrome OS and not push my test machine (2 GB of RAM total) to the limit. You would choose the amount of RAM you think is appropriate here.
3. Select the Chrome OS disk image

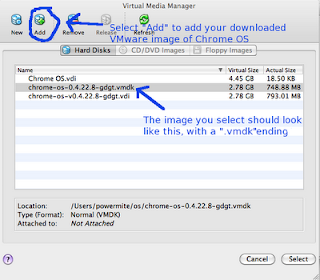
Next is the hard disk image selection. Select "Use existing hard disk" and click the small folder icon next to the text field to browse for the Chrome OS .vmdk image you downloaded. You will need to add a new disk image by selecting "New" in the top left corner and then browse to where your Chrome OS image was downloaded.
Continue after the break for the rest of the guide.
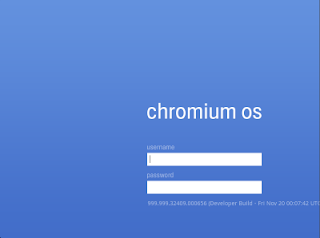
Next, VirtualBox simply asks you if you really want to make the Chrome OS machine. You probably do, so just select finish. Now you are ready to start your machine and see Chrome OS running for the first time! Simply push "Start" when your machine is highlighted and Chrome OS should boot up (quite quickly, too!). As an aside, I increased my video memory for Chrome OS to 60 MB (the default for an unknown machine is 5 MB). This may not be necessary, but you can do so under the settings for your machine.
If you can't get the network to work on your Chrome OS virtual machine, try logging in with the username "chronos". It has no password and many people have reported that it fixes the network problem.

Check out the comments for some troubleshooting if you are having a hard time. Or just leave a comment if you can help or have an opinion on Chrome OS!
1. Make a New Machine

Update: It looks like the network connection won't work in Chrome OS for some people if they choose "Other" for their OS. We found out (through the discussion in the comments) that picking "Linux" as the operating system and "Linux 2.6" as the version might work better for some host PCs.
2. Select the amount of RAM for you Chrome OS virtual machine

Next you select the amount of RAM to dedicate to your Chrome OS virtual instance. I selected 542 MB of RAM as this should be plenty for Chrome OS and not push my test machine (2 GB of RAM total) to the limit. You would choose the amount of RAM you think is appropriate here.
3. Select the Chrome OS disk image

Next is the hard disk image selection. Select "Use existing hard disk" and click the small folder icon next to the text field to browse for the Chrome OS .vmdk image you downloaded. You will need to add a new disk image by selecting "New" in the top left corner and then browse to where your Chrome OS image was downloaded.
Continue after the break for the rest of the guide.
Next, VirtualBox simply asks you if you really want to make the Chrome OS machine. You probably do, so just select finish. Now you are ready to start your machine and see Chrome OS running for the first time! Simply push "Start" when your machine is highlighted and Chrome OS should boot up (quite quickly, too!). As an aside, I increased my video memory for Chrome OS to 60 MB (the default for an unknown machine is 5 MB). This may not be necessary, but you can do so under the settings for your machine.
If you can't get the network to work on your Chrome OS virtual machine, try logging in with the username "chronos". It has no password and many people have reported that it fixes the network problem.

Check out the comments for some troubleshooting if you are having a hard time. Or just leave a comment if you can help or have an opinion on Chrome OS!
Subscribe to:
Comments (Atom)
How to Put Google Adsense Below Post Title in Blogger?
Adsense is used by majority of expert bloggers for their website monetization because it is a cookie based contextual advertising syste...

-
Adsense is used by majority of expert bloggers for their website monetization because it is a cookie based contextual advertising syste...
-
Portable Micro XP 0.82[Launch from USB stick in side Windows] Image - img187. imageshack. us/img187/666/xpusbstckku2. jpg Descriptio...
-
nod 32 usernames and pwd UserName: EAV-16110434 PassWord: n4vejptbpc UserName: EAV-13559906 PassWord: 7urej5xva5 UserName: EAV-16340916 Pass...